Categories
Web development

CSS transition-duration Property

CSS transition-duration Property

The CSS transition-duration property defines the speed (seconds (s) or milliseconds (ms)) a transition effect takes to complete.

Demo:

Hover over the square first (the square will change the colour and size) then, click the “Try it” button and mouse over the square again. The changes will now happen much faster! The CSS transition-duration property value has been changed from 3s to .5s.


Syntax:

transition-duration: time;

time – defines the speed (seconds (s) or milliseconds (ms)) a transition effect takes to complete. The default value is 0s.

Example:

<!DOCTYPE html>
<html>
<head>
<style> 
.square {
  width: 100px;
  height: 100px;
  background: #2a9d8f;
  transition-property: width;
  transition-duration: 2s;
}

.square:hover {
  width: 200px;
}
</style>
</head>
<body>

<div class="square"></div>

</body>
</html>

Output:

Hover over the square below, to see the transition effect (the transition effect will last for 2 seconds):


Enjoy coding!

Read also:
CSS Transition

CSS transition-timing-function Property

CSS animation Property

Categories
Web development

CSS transition-timing-function Property

CSS transition-timing-function Property

The CSS transition-timing-function property defines the speed curve of the transition effect.

The CSS transition-timing-function property allows a transition effect to change speed over its duration.

Demo:

Hover over the rectangles, to see the different transition effects:

linear
ease
ease-in
ease-out
ease-in-out
steps

Syntax:

transition-timing-function: linear|ease|ease-in|ease-out|ease-in-out|step-start|step-end|steps(int,start|end)|cubic-bezier(n,n,n,n);

linear – defines a transition effect with the same speed from start to end.

ease (default) – defines a transition effect with a slow start, then fast, then end slowly.

ease-in – defines a transition effect with a slow start.

ease-out – defines a transition effect with a slow end.

ease-in-out – defines a transition effect with a slow start and end.

step-start – equivalent to steps(1, start).

step-end – equivalent to steps(1, end).

steps (int, start | end) – define a stepping function, with two parameters. The first parameter specifies the number of intervals in the function. The second parameter (optional), is either the value “start” or “end”, and specifies the point at which the change of values occur within the interval.

cubic-bezier (n, n, n, n) – specify your own values in the cubic-bezier function (numeric values from 0 to 1).

Example:

<!DOCTYPE html>
<html>
<head>
<style> 
#square {
  width: 100px;
  height: 50px;
  background: #2a9d8f;
  display: flex;
  justify-content: center;
  font-size: 15px;
  align-items: center;
  color: white;
  font-weight: bold;
  transition: width 2s;
}

#square {transition-timing-function: linear;}

#square:hover {
  width: 300px;
}
</style>
</head>
<body>

<div id="square">linear</div>

</body>
</html>

Output:

Hover over the rectangle, to see the transition effect:

linear

Enjoy coding!

Hey, here’s something that might interest you:

CSS animation-timing-function Property

CSS Transition VS. CSS Animation

CSS Transition

Categories
Premiere Pro

Push Slide Transition Effect in Adobe Premiere Pro

Push Slide Transition Effect in Adobe Premiere Pro

To create Push Slide Transition Effect in Adobe Premiere Pro follow the steps below and watch the video tutorial.

Step1.

Create the Sequence:

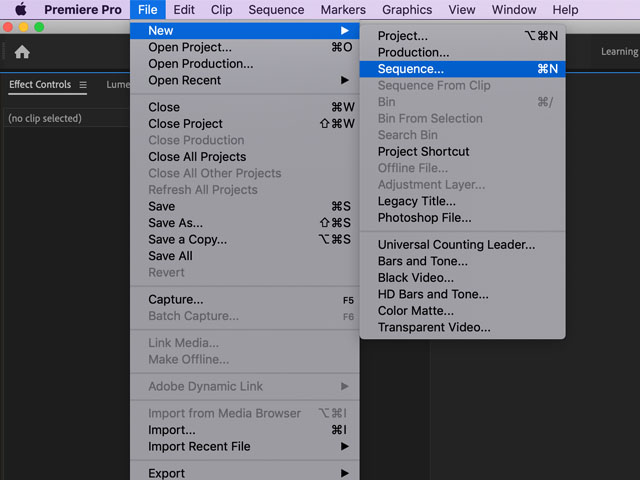
Open the Adobe Premiere Pro and create the new sequence (go to the File ->New->Sequence…)

New sequence Adobe Premiere Pro

In the new sequence window, go to the settings and change the frame size to your preferred one. Make sure that the square pixels(Pixels Aspect Ratio) option has been selected. Press Okay.

Adobe Premiere Pro sequence settings

Step2.

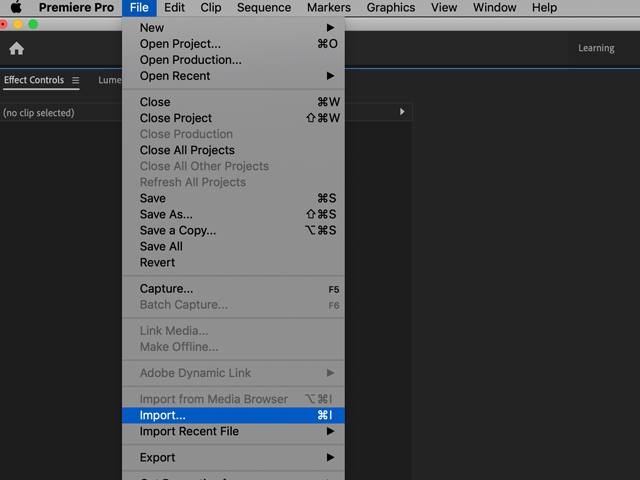
Import images/ videos to the project:

Import images/ videos to the project:

Note: If you don’t have ready images/ videos use mine above for training purposes.

Importing video to Adobe Premiere Pro

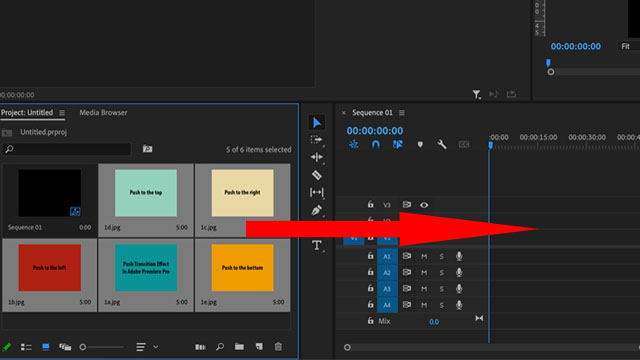
Drag your images/ video to the sequence panel:

Adobe Premiere Pro sequence panel

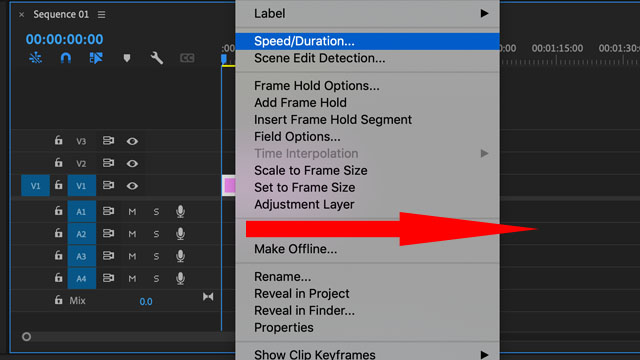
In a sequence panel right click on the first square (image/ video) and select the Speed/Duration… option.

Adobe Premiere Pro speed/ duration

Set the duration of the first image/ video to your preferred one and press Okay (repeat with all squares):

Adobe Premiere Pro Push Slide Effect

To remove the spaces between images/videos right click on the empty space in between the squares and select Ripple Delete (repeat with all empty spaces left.):

Adobe Premiere Pro Push Slide Transition Effect

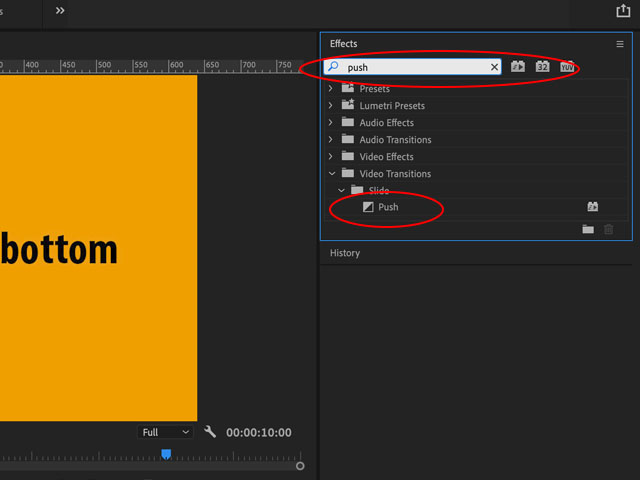
Go to the Effects panel and type in a search bar – “push“.

Adobe Premiere Pro push effect

Step3.

Add the push transition:

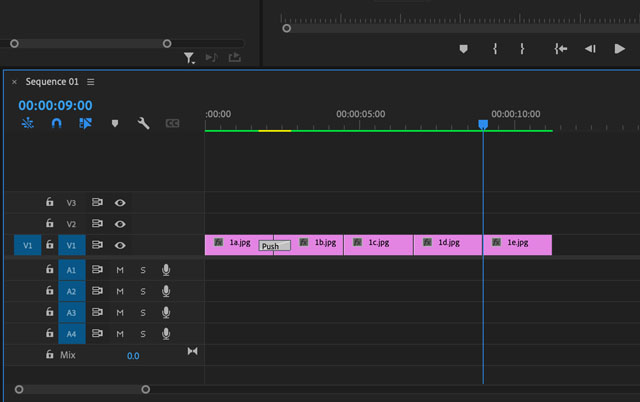
Drag the searched effect in between the first and second square:

Adobe Premiere Pro Push Effect

Click on the added effect and go to the Effect Controls panel:

Adobe Premiere Pro Push Slide Effect

In Effect Controls panel you can change direction and duration of the effect. Repeat with the rest squares (drag and set the effect).

Watch also the video tutorial:

Read also:

How to make slide text effect in Premiere Pro?

How to create a GIF in Adobe Premiere Pro?