Categories
Web development

HTML canvas globalCompositeOperation Property

HTML canvas globalCompositeOperation Property

The HTML canvas globalCompositeOperation property sets how a source (new) image is drawn into a destination (existing) image.

Example:

<!DOCTYPE html>
<html>
<body>

<canvas id="composite" width="300" height="150" style="border:1px solid #333;">
</canvas>

<script>
var c = document.getElementById("composite");
var ctx = c.getContext("2d");
ctx.fillStyle = "#2a9d8f";
ctx.fillRect(40, 20, 75, 75);
ctx.fillStyle = "#e9c46a";
ctx.globalCompositeOperation = "source-over";
ctx.fillRect(60, 50, 75, 75);
ctx.fillStyle = "#2a9d8f";
ctx.fillRect(160, 20, 75, 75);
ctx.fillStyle = "#e9c46a";
ctx.globalCompositeOperation = "destination-over";
ctx.fillRect(190, 50, 75, 75);
</script>

</body>
</html>

Output:

Syntax:

context.globalCompositeOperation="source-in";

source-over (default) – displays the source image over the existing image.

source-atop – displays the source image on top of the existing image.

source-in – displays the source image into the existing image.

source-out – displays the source image out of the destination image.

destination-over – displays the destination image over the source image.

destination-atop – displays the existing image on top of the source image.

destination-in – displays the destination image into the source image.

destination-out – displays the destination image out of the source image.

lighter – displays the source image + the destination image.

copy – displays the source image (the existing image is ignored).

xor – the source image is combined by using an exclusive OR with the destination image.

Example:

<!DOCTYPE html>
<html>
<head>
<style>
canvas {
  border: 1px solid #333;
  margin-right: 15px;
  margin-bottom: 20px;
}
</style>
</head>
<body>

<script>
var gco = new Array();
gco.push("source-atop");
gco.push("source-in");
gco.push("source-out");
gco.push("source-over");
gco.push("destination-atop");
gco.push("destination-in");
gco.push("destination-out");
gco.push("destination-over");
gco.push("lighter");
gco.push("copy");
gco.push("xor");

var n;
for (n = 0; n < gco.length; n++) {
  document.write("<div id='p_" + n + "' style='float:left;'>" + gco[n] + ":<br>");
  var c = document.createElement("canvas");
  c.width = 100;
  c.height = 100;
  document.getElementById("p_" + n).appendChild(c);
  var ctx = c.getContext("2d");    
  ctx.fillStyle = "#2a9d8f";
  ctx.fillRect(10, 10, 50, 50);
  ctx.globalCompositeOperation = gco[n];
  ctx.beginPath();
  ctx.fillStyle = "#e9c46a";
  ctx.arc(50, 50, 30, 0, 2 * Math.PI);
  ctx.fill();
  document.write("</div>");
}
</script>

</body>
</html>

Output:

HTML canvas globalCompositeOperation Property

Enjoy coding!

Categories
Web development

HTML Canvas global/Alpha property

The HTML canvas globalAlpha property sets the alpha or transparency value of the drawing.

Syntax:

context.globalAlpha=number;

number – the value must be a number between 0.0 (fully transparent) and 1.0 (no transparency).

Example:

<!DOCTYPE html>
<html>
<body>

<canvas id="transparency" width="200" height="200" style="border:1px solid #333;"></canvas>

<script>
var c = document.getElementById("transparency");
var ctx = c.getContext("2d");
ctx.fillStyle = "#2a9d8f";
ctx.fillRect(30, 30, 75, 75);
ctx.globalAlpha = 0.4;
ctx.fillStyle = "#e76f51"; 
ctx.fillRect(60, 60, 75, 75); 
ctx.fillStyle = "#e9c46a"; 
ctx.fillRect(90, 90, 75, 75);
</script>

</body>
</html>

Output:


Enjoy coding!

Categories
Web development

HTML Canvas Text

HTML Canvas Text

To start to draw text on a canvas, use the following properties and methods:

font

fillText(text,x,y)

strokeText(text,x,y)

The HTML canvas font property sets the current font properties for text content on the canvas. The HTML canvas fillText() method draws filled text on the canvas, and the HTML canvas strokeText() method draws text (no fill) on the canvas.

Example1: Filled Text

<!DOCTYPE html>
<html>
<body>

<canvas id="basicText" width="200" height="100"
style="border:1px solid #333;">
</canvas>

<script>
var canvas = document.getElementById("basicText");
var ctx = canvas.getContext("2d");
ctx.font = "25px Verdana";
ctx.fillText("Hello World",27,60);
</script>

</body>
</html>

Output:

Example2: Stroke Text

<!DOCTYPE html>
<html>
<body>

<canvas id="basicText" width="200" height="100"
style="border:1px solid #333;">
</canvas>

<script>
var canvas = document.getElementById("basicText");
var ctx = canvas.getContext("2d");
ctx.font = "25px Verdana";
ctx.strokeText("Hello World",27,60);
</script>

</body>
</html>

Output:

HTML canvas stroke text

To fill text in color add fillStyle property, and to align the text add the textAlign property.

The HTML canvas textAlign property sets the current alignment for text content, according to the anchor point.
The HTML canvas textAlign can have the following values:
center/ end/ left/ right/ start(default).

Example:

<!DOCTYPE html>
<html>
<body>

<canvas id="alignCanvas" width="300" height="200"
style="border:1px solid #333;">
</canvas>

<script>
var canvas = document.getElementById("alignCanvas");
var ctx=canvas.getContext("2d");
ctx.font="30px Tahoma";
ctx.fillStyle = "#e76f51";
ctx.textAlign = "center";
ctx.fillText("Hello World", canvas.width/2, canvas.height/2);
</script>

</body>
</html>

Output:


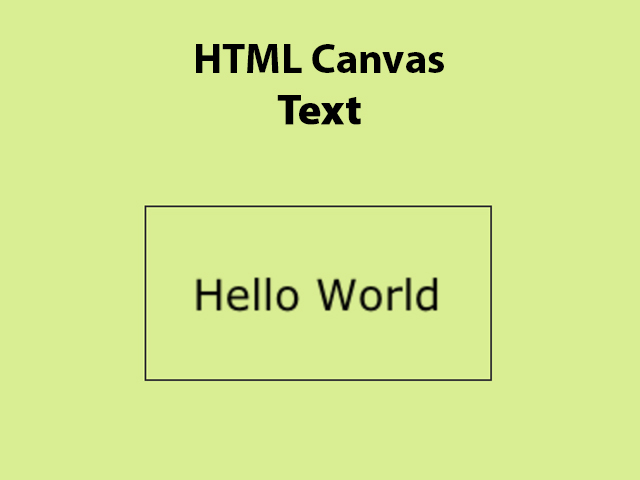
The HTML canvas measureText() method returns an object that contains the width of the specified text (you can use this method if you need to know the width of a text, before writing it on the canvas.).

Example:

<!DOCTYPE html>
<html>
<body>

<canvas id="measureText" width="300" height="150" style="border:1px solid #333;"></canvas>

<script>
var c = document.getElementById("measureText");
var ctx = c.getContext("2d");
ctx.font = "25px Tahoma";
var txt = "Hello World"
ctx.fillText("width:" + ctx.measureText(txt).width, 10, 50);
ctx.fillText(txt, 10, 100);
</script>

</body>
</html>

Output:


Enjoy coding!

Categories
Web development

HTML Canvas drawImage() method

HTML5 Canvas draw Image method

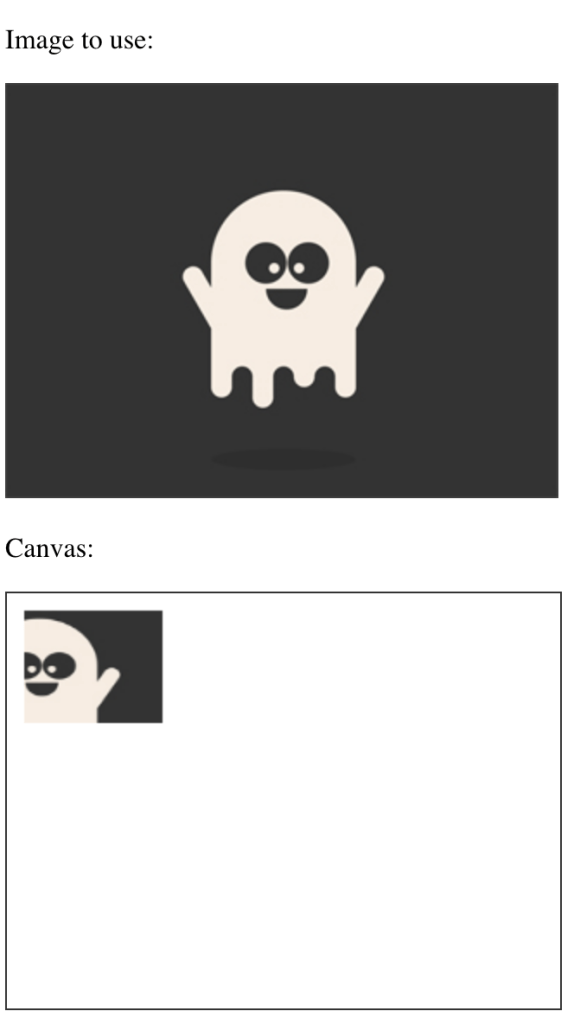
The HTML canvas drawImage() method creates an image, canvas, or video onto the canvas.

Note: You cannot call the drawImage() method before the image has loaded. You can call drawImage() from window.onload() /or document.getElementById(“imageID”).onload.

Syntax (position the image on the canvas):

context.drawImage(img/v,x,y);

img/v – defines the image, canvas, or video element to use.

x – the x-coordinate where to place the image on the canvas.

y – the y-coordinate where to place the image on the canvas.

Example:

<!DOCTYPE html>
<html>
<body>

<p>Image to use:</p>
<img id="ghost" width="320" height="240" src="https://lenadesign.org/wp-content/uploads/2021/06/ghost-example.jpg" alt="Ghost">

<p>Canvas:</p>
<canvas id="ghostCanvas" width="340" height="260" style="border:1px solid #333;">
</canvas>

<script>
window.onload = function() {
  var c = document.getElementById("ghostCanvas");
  var ctx = c.getContext("2d");
  var img = document.getElementById("ghost");
  ctx.drawImage(img, 10, 10);
}
</script>

</body>
</html>

Output:

HTML canvas drawImage()

Syntax (clip the image and position the clipped part on the canvas):

context.drawImage(img/v,sx,sy,swidth,sheight,x,y,width,height);

sx – the x-coordinate where to start clipping.

sy – the y-coordinate where to start clipping.

swidth – the width of the clipped image.

sheight – the height of the clipped image.

width – the width of the image to use.

height – the height of the image to use.

Example:

<!DOCTYPE html>
<html>
<body>

<p>Image to use:</p>
<img id="example-ghost" src="https://lenadesign.org/wp-content/uploads/2021/06/ghost-example.jpg" alt="example-ghost" width="320" height="240">

<p>Canvas:</p>
<canvas id="ghost-canvas" width="320" height="240" style="border:1px solid #333;"></canvas>

<script>
window.onload = function() {
  var c = document.getElementById("ghost-canvas");
  var ctx = c.getContext("2d");
  var img = document.getElementById("example-ghost");
  ctx.drawImage(img, 150, 55, 100, 100, 10, 10, 80, 65);
};
</script>

</body>
</html>

Output:

HTML canvas clip drawImage()

Example:

<!DOCTYPE html>
<html>
<body>

<p>Video to use:</p>
<video id="video-1" controls width="320" autoplay>
    <source src="https://videos.files.wordpress.com/lFj3lsG4/valentines-day-movie_dvd.mp4" type="video/mp4"></source>
</video>

<p>Canvas:</p>
<canvas id="videoCanvas" width="340" height="260" style="border:1px solid #333;"></canvas>

<script>
var v = document.getElementById("video-1");
var c = document.getElementById("videoCanvas");
var ctx = c.getContext("2d");
var i;

v.addEventListener("play", function() {i = window.setInterval(function() {ctx.drawImage(v,10,10,320,240)},20);}, false);
v.addEventListener("pause", function() {window.clearInterval(i);}, false);
v.addEventListener("ended", function() {clearInterval(i);}, false); 
</script>

</body>
</html>

Output:

Video to use:


Canvas:


Categories
Web development

HTML Canvas Transformations

HTML5 Canvas Transformstions

In HTML canvas you can scale, rotate, move, and transform your current drawing.

scale()

The HTML canvas scale() method scales the current drawing (smaller/bigger).

Syntax:

context.scale(scalewidth,scaleheight);

Example:

<!DOCTYPE html>
<html>
<body>

<canvas id="scale" width="200" height="200" style="border:1px solid #333;"></canvas>

<script>
var c = document.getElementById("scale");
var ctx = c.getContext("2d");

ctx.strokeRect(15, 25, 75, 45);
ctx.scale(2, 2);
ctx.strokeRect(15, 25, 75, 45);
</script> 

</body>
</html>

Output:


rotate()

The HTML canvas rotate() method rotates the current drawing.

Syntax:

context.rotate(angle);

Example:

<!DOCTYPE html>
<html>
<body>

<canvas id="rotateCanvas" width="200" height="200" style="border:1px solid #333;"></canvas>

<script>
var c = document.getElementById("rotateCanvas");
var ctx = c.getContext("2d");
ctx.rotate(20 * Math.PI / 180);
ctx.fillRect(80, 10, 100, 100);
</script>

</body>
</html>

Output:


translate()

The HTML canvas translate() method remaps the (0,0) position on the canvas.

Syntax:

context.translate(x,y);

Example:

<!DOCTYPE html>
<html>
<body>

<canvas id="translateCanvas" width="200" height="200" style="border:1px solid #333;"></canvas>

<script>
var c = document.getElementById("translateCanvas");
var ctx = c.getContext("2d");
ctx.fillRect(20, 20, 80, 80);
ctx.translate(80, 80);
ctx.fillRect(20, 20, 80, 80);
</script>

</body>
</html>

Output:


transform()

The HTML canvas transform() method lets you scale, rotate, move, and skew the current context.

Syntax:

context.transform(a,b,c,d,e,f);

a – horizontal scaling.

b – horizontal skewing.

c – vertical skewing.

d – vertical scaling.

e – horizontal moving.

f – vertical moving.

Example:

<!DOCTYPE html>
<html>
<body>

<canvas id="transformCanvas" width="200" height="200" style="border:1px solid #333;"></canvas>

<script>
var c = document.getElementById("transformCanvas");
var ctx = c.getContext("2d");

ctx.fillStyle = "#2a9d8f";
ctx.fillRect(50, 0, 100, 100)

ctx.transform(1, 0.5, -0.5, 1, 10, 20);
ctx.fillStyle = "#f4a261";
ctx.fillRect(50, 0, 100, 100);

ctx.transform(1, 0.5, -0.5, 1, 30, 10);
ctx.fillStyle = "#e9c46a";
ctx.fillRect(50, 0, 100, 100);
</script>

</body>
</html>

Output:


setTransform()

The HTML canvas setTransform() method resets the current transform to the identity matrix and then runs transform() with the same arguments.

The HTML canvas setTransform() method lets you scale, rotate, move, and skew the current context.

Syntax:

context.setTransform(a,b,c,d,e,f);

a – horizontal scaling.

b – horizontal skewing.

c – vertical skewing.

d – vertical scaling.

e – horizontal moving.

f – vertical moving.

Example:

<!DOCTYPE html>
<html>
<body>

<canvas id="setTransform" width="200" height="200" style="border:1px solid #333;"></canvas>

<script>
var c = document.getElementById("setTransform");
var ctx = c.getContext("2d");

ctx.fillStyle = "#2a9d8f";
ctx.fillRect(20, 20, 100, 100)

ctx.setTransform(1,0.5, -0.5, 1, 30, 10);
ctx.fillStyle = "#f4a261";
ctx.fillRect(20, 20, 100, 100);

ctx.setTransform(1,0.5, -0.5, 5, 60, 10);
ctx.fillStyle = "#e9c46a";
ctx.fillRect(20, 20, 100, 100);
</script>

</body>
</html>

Output:


Enjoy coding!

Categories
Web development

HTML Canvas Paths

HTML canvas paths

The HTML canvas paths allow you to create custom shapes.

To draw a path use the beginPath(), moveTo(), lineTo(), stroke() methods together.

Example:

<!DOCTYPE html>
<html>
<body>

<canvas id="example-1" width="300" height="150" style="border:1px solid #333;">
</canvas>

<script>
var c = document.getElementById("example-1");
var ctx = c.getContext("2d");

ctx.beginPath();              
ctx.lineWidth = "4";
ctx.strokeStyle = "#2a9d8f";  
ctx.moveTo(30, 75);
ctx.lineTo(250, 75);
ctx.stroke();  

ctx.beginPath();
ctx.strokeStyle = "#e76f51"; 
ctx.moveTo(70, 20);
ctx.lineTo(170, 120);            
ctx.stroke(); 
</script>

</body>
</html>

Output:


The HTML canvas beginPath() method starts a path.

Syntax:

context.beginPath();

The HTML canvas moveTo() method moves the path to the defined point in the canvas (without creating a line).

Syntax:

context.moveTo(x,y);

x – the x-coordinate of where to move the path to.

y – the y-coordinate of where to move the path to.

The HTML canvas lineTo() method adds a new point and creates a line to that point from the last defined point in the canvas (without creating a line).

Syntax:

context.lineTo(x,y);

x – the x-coordinate of where to create the line to.

y – the y-coordinate of where to create the line to.

The HTML canvas stroke() method draws the path you have defined with all those beginPath(), moveTo() and lineTo() methods.

Example:

<!DOCTYPE html>
<html>
<body>

<canvas id="example-2" width="300" height="150" style="border:1px solid #333;"></canvas>

<script>
var c = document.getElementById("example-2");
var ctx = c.getContext("2d");
ctx.beginPath();
ctx.moveTo(50, 50);
ctx.lineTo(50, 100);
ctx.lineTo(100, 100);
ctx.strokeStyle = "#2a9d8f";
ctx.stroke();
</script> 

</body>
</html>

Output:


Note: The default color of a stroke is black. Use the strokeStyle property to draw with another color/gradient.

The HTML canvas fill() method fills the current path.

Example:

<!DOCTYPE html>
<html>
<body>

<canvas id="fillPath" width="200" height="200" style="border:1px solid #333;"></canvas>

<script>
var c = document.getElementById("fillPath");
var ctx = c.getContext("2d");
ctx.beginPath();
ctx.rect(50, 50, 100, 100);
ctx.fillStyle = "#e76f51";
ctx.fill();

ctx.beginPath();
ctx.rect(40, 40, 100, 100);
ctx.fillStyle = "#2a9d8f";
ctx.fill();
</script> 

</body>
</html>

Output:


Note: The default color is black. Use the fillStyle property to fill the path with another color/gradient.

The HTML canvas closePath() method together with the stroke() method draws a path from the current point back to the starting point.

Syntax:

context.closePath();

Example:

<!DOCTYPE html>
<html>
<body>

<canvas id="closePath" width="100" height="100" style="border:1px solid #333"></canvas>

<script>
var c = document.getElementById("closePath");
var ctx = c.getContext("2d");
ctx.beginPath();
ctx.moveTo(100, 0);
ctx.lineTo(0, 100);
ctx.lineTo(100, 100);
ctx.closePath();
ctx.stroke();
</script>

</body>
</html>

Output:


To fill the path use fill() method to fill the drawing (black is the default). Use the fillStyle property to fill with another color/gradient.

Example:

<!DOCTYPE html>
<html>
<body>

<canvas id="close-Path" width="100" height="100" style="border:1px solid #333"></canvas>

<script>
var c = document.getElementById("close-Path");
var ctx = c.getContext("2d");
ctx.beginPath();
ctx.moveTo(100, 0);
ctx.lineTo(0, 100);
ctx.lineTo(100, 100);
ctx.closePath();
ctx.stroke();
ctx.fillStyle = "#2a9d8f";
ctx.fill();
</script>

</body>
</html>

Output:


The HTML canvas clip() method clips a region of any shape and size from the original canvas.

Syntax:

context.clip();

Example:

<!DOCTYPE html>
<html>
<body>

<span>Without clip():</span>
<canvas id="clipPath" width="200" height="200" style="border:1px solid #333;"></canvas>

<script>
var c = document.getElementById("clipPath");
var ctx = c.getContext("2d");
ctx.rect(50, 50, 100, 100);
ctx.stroke();
ctx.fillStyle = "#2a9d8f";
ctx.fillRect(0, 0, 100, 100);
</script> 

<span>With clip():</span>
<canvas id="clip-path" width="200" height="200" style="border:1px solid #333;"></canvas>

<script>
var c = document.getElementById("clip-path");
var ctx = c.getContext("2d");
ctx.rect(50, 50, 100, 100);
ctx.stroke();
ctx.clip();
ctx.fillStyle = "#2a9d8f";
ctx.fillRect(0, 0, 100, 100);
</script> 

</body>
</html>

Output:

Without clip():

With clip():

The HTML canvas bezierCurveTo() method adds a point to the current path by using the specified control points that represent a cubic Bézier curve.

Syntax:

context.bezierCurveTo(cp1x,cp1y,cp2x,cp2y,x,y);

cp1x – the x-coordinate of the first Bézier control point.

cp1y – the y-coordinate of the first Bézier control point.

cp2x – the x-coordinate of the second Bézier control point.

cp2y – the y-coordinate of the first Bézier control point.

x – the x-coordinate of the ending point.

y – the y-coordinate of the ending point.

Example:

<!DOCTYPE html>
<html>
<body>

<canvas id="bezierCurve" width="200" height="200" style="border:1px solid #333;"></canvas>

<script>
var c = document.getElementById("bezierCurve");
var ctx = c.getContext("2d");
ctx.beginPath();
ctx.moveTo(50, 50);
ctx.bezierCurveTo(50, 150, 100, 100, 150, 150);
ctx.stroke();
</script> 

</body>
</html>

Output:


The HTML canvas quadraticCurveTo() method adds a point to the current path by using the specified control points that represent a quadratic Bézier curve.

Syntax:

context.quadraticCurveTo(cpx,cpy,x,y);

cpx – the x-coordinate of the Bézier control point.

cpy – the y-coordinate of the Bézier control point.

x – the x-coordinate of the ending point.

y – the y-coordinate of the ending point.

Example:

<!DOCTYPE html>
<html>
<body>

<canvas id="quadraticCurve" width="200" height="200" style="border:1px solid #333;"></canvas>

<script>
var c = document.getElementById("quadraticCurve");
var ctx = c.getContext("2d");
ctx.beginPath();
ctx.moveTo(50, 50);
ctx.quadraticCurveTo(50, 150, 100, 50);
ctx.stroke();
</script> 

</body>
</html>

Output:


The HTML canvas arc() method draws an arc/curve (used to draw circles or parts of circles).

Syntax:

context.arc(x,y,r,sAngle,eAngle,counterclockwise);

x – the x-coordinate of the center of the circle.

y – the y-coordinate of the center of the circle.

r – the radius of the circle.

sAngle – the starting angle.

eAngle – the ending angle.

counterclockwise (optional) – defines whether the drawing should be counterclockwise or clockwise.

Example:

<!DOCTYPE html>
<html>
<body>

<canvas id="circle" width="200" height="200" style="border:1px solid #333;">
</canvas>

<script>
var c = document.getElementById("circle");
var ctx = c.getContext("2d");
ctx.beginPath();
ctx.arc(100, 100, 50, 0, 2 * Math.PI);
ctx.stroke();
</script> 

</body>
</html>

Output:


The HTML canvas arcTo() method draws an arc/curve between two tangents on the canvas.

Syntax:

context.arcTo(x1,y1,x2,y2,r);

x1 – the x-coordinate of the first tangent.

y1 – the y-coordinate of the first tangent.

x2 – the x-coordinate of the second tangent.

y2 – the y-coordinate of the second tangent.

r – the radius of the arc.

Example:

<!DOCTYPE html>
<html>
<body>

<canvas id="arcTo" width="200" height="200" style="border:1px solid #333;"></canvas>

<script>
var c = document.getElementById("arcTo");
var ctx = c.getContext("2d");
ctx.beginPath();     
ctx.moveTo(20, 20);               
ctx.lineTo(100, 20);           
ctx.arcTo(150, 20, 150, 70, 50);  
ctx.lineTo(150, 120);           
ctx.stroke();                
</script> 

</body>
</html>

Output:


The HTML canvas isPointInPath() method returns true if the specified point is in the current path, otherwise false.

Syntax:

context.isPointInPath(x,y);

x – the x-coordinate to test.

y – the x-coordinate to test.

Example:

<!DOCTYPE html>
<html>
<body>

<canvas id="test" width="200" height="200" style="border:1px solid #333;"></canvas>

<script>
var c = document.getElementById("test");
var ctx = c.getContext("2d");
ctx.rect(50, 50, 100, 100);
if (ctx.isPointInPath(50, 50)) {
  ctx.stroke();
};
</script> 

</body>
</html>

Output:


Enjoy coding!

Categories
Web development

HTML Canvas Rectangle

HTML canvas rectangle

The HTML canvas rect() method draws a rectangle.

Syntax:

context.rect(x,y,width,height);

x – the x-coordinate of the upper-left corner of the rectangle.

y – the y-coordinate of the upper-left corner of the rectangle.

width – the width of the rectangle (px).

height – the height of the rectangle (px).

The HTML canvas strokeRect() method creates a rectangle (no fill).

Syntax:

context.strokeRect(x,y,width,height);

x – the x-coordinate of the upper-left corner of the rectangle.

y – the y-coordinate of the upper-left corner of the rectangle.

width – the width of the rectangle (px).

height – the height of the rectangle (px).

Example:

<!DOCTYPE html>
<html>
<body>

<canvas id="rectangle" width="200" height="200" style="border:1px solid #333;"></canvas>

<script>
var c = document.getElementById("rectangle");
var ctx = c.getContext("2d");
ctx.beginPath();
ctx.rect(50, 50, 100, 100);
ctx.stroke();
</script> 

</body>
</html>

Output:


Note: The default color of the stroke is black. Use the HTML canvas strokeStyle property to define a color, gradient, or pattern to style the stroke.

The HTML canvas fillRect() method creates a “filled” rectangle.

Syntax:

context.fillRect(x,y,width,height);

x – the x-coordinate of the upper-left corner of the rectangle.

y – the y-coordinate of the upper-left corner of the rectangle.

width – the width of the rectangle (px).

height – the height of the rectangle (px).

Example:

<!DOCTYPE html>
<html>
<body>

<canvas id="rectangleFill" width="200" height="200" style="border:1px solid #333;"></canvas>

<script>
var c = document.getElementById("rectangleFill");
var ctx = c.getContext("2d");
ctx.fillRect(50, 50, 100, 100);
</script>

</body>
</html>

Output:


Note: The default color of the fill is black. Use the HTML canvas fillStyle property to define a color, gradient, or pattern used to fill the drawing.

The HTML canvas clearRect() method clears the defined pixels within a given rectangle.

Syntax:

context.clearRect(x,y,width,height);

x – the x-coordinate of the upper-left corner of the rectangle.

y – the y-coordinate of the upper-left corner of the rectangle.

width – the width of the rectangle (px).

height – the height of the rectangle (px).

Example:

<!DOCTYPE html>
<html>
<body>

<canvas id="myCanvas" width="200" height="200" style="border:1px solid #333;"></canvas>

<script>
var c = document.getElementById("myCanvas");
var ctx = c.getContext("2d");
ctx.fillStyle = "#2a9d8f";
ctx.fillRect(0, 0, 200, 200);
ctx.clearRect(50, 50, 100, 100);
</script>

</body>
</html>

Output:


Enjoy coding!

Categories
Web development

HTML Canvas Line Styles

HMTL Canvas Line Styles

lineCap

The HTML canvas lineCap property sets or returns the style of the end caps for a line.

Syntax:

context.lineCap="butt|round|square";

butt (default) – flat edges.

round – round edges.

square – square edges.

Example:

<!DOCTYPE html>
<html>
<body>

<canvas id="lineCap" width="240" height="150" style="border:1px solid #333;">
</canvas>

<script>
var c = document.getElementById("lineCap");
var ctx = c.getContext("2d");

ctx.beginPath();
ctx.lineWidth = 8;
ctx.lineCap = "butt";
ctx.moveTo(30, 20);
ctx.lineTo(200, 20);
ctx.stroke();

ctx.beginPath();
ctx.lineCap = "round";
ctx.moveTo(30, 70);
ctx.lineTo(200, 70);
ctx.stroke();

ctx.beginPath();
ctx.lineCap = "square";
ctx.moveTo(30, 120);
ctx.lineTo(200, 120);
ctx.stroke();
</script>

</body>
</html>

Output:


lineJoin

The HTML canvas lineJoin property sets or returns the type of corner created, when two lines meet.

Syntax:

context.lineJoin="miter|round|bevel";

miter (default) – a sharp corner.

round – a rounded corner.

bevel – a beveled corner.

Example:

<!DOCTYPE html>
<html>
<body>

<canvas id="roundedCorener" width="200" height="200" style="border:1px solid #333;">
</canvas>

<script>
var c = document.getElementById("roundedCorener");
var ctx = c.getContext("2d");
ctx.beginPath();
ctx.lineWidth = 10;
ctx.lineJoin = "round";
ctx.moveTo(20, 20);
ctx.lineTo(150, 75);
ctx.lineTo(20, 150);
ctx.stroke();
</script>

</body>
</html>

Output:


lineWidth

The HTML canvas lineWidth property sets or returns the current line width, in pixels.

Syntax:

context.lineWidth=number;

number – line width, in pixels.

Example:

<!DOCTYPE html>
<html>
<body>

<canvas id="lineWidth" width="200" height="200" style="border:1px solid #333;"></canvas>

<script>
var c = document.getElementById("lineWidth");
var ctx = c.getContext("2d");
ctx.lineWidth = 8;
ctx.strokeRect(50, 50, 100, 100);
</script>

</body>
</html>

Output:


miterLimit

The HTML canvas miterLimit property sets or returns the maximum miter length.

The miter length is the distance between the inner corner and the outer corner where two lines meet.

Syntax:

context.miterLimit=number;

number – a positive number that defines the maximum miter length.

Example:

<!DOCTYPE html>
<html>
<body>

<canvas id="miterLimit" width="200" height="150" style="border:1px solid #333;"></canvas>

<script>
var c = document.getElementById("miterLimit");
var ctx = c.getContext("2d");
ctx.lineWidth = 8;
ctx.lineJoin = "miter";
ctx.miterLimit = 5;
ctx.moveTo(20, 20);
ctx.lineTo(50, 27);
ctx.lineTo(20, 34);
ctx.stroke();
</script>

</body>
</html>

Output:


Enjoy coding!

Categories
Web development

HTML Canvas Shadows

HTML5 Canvas Shadows

To create shadow in HTML canvas use the shadowColor property together with the shadowBlur property.

The HTML canvas shadowColor property sets or returns the color to use for shadows.

Syntax:

context.shadowColor=color;

The HTML canvas shadowBlur property sets or returns the blur level for shadows.

Syntax:

context.shadowBlur=number;

Example:

<!DOCTYPE html>
<html>
<body>

<canvas id="shadow-blur" width="300" height="180" style="border:1px solid #333;">
</canvas>

<script>
var c = document.getElementById("shadow-blur");
var ctx = c.getContext("2d");
ctx.shadowBlur = 30;
ctx.fillStyle = "#2a9d8f";

ctx.shadowColor = "black";
ctx.fillRect(30, 40, 100, 100);

ctx.shadowColor = "#264653";
ctx.fillRect(170, 40, 100, 100);
</script>

</body>
</html>

Output:


To adjust the shadow use the shadowOffsetX and shadowOffsetY properties.

The HTML canvas shadowOffsetX property sets or returns the horizontal distance of the shadow from the shape.

Syntax:

context.shadowOffsetX=number;

Example:

<!DOCTYPE html>
<html>
<body>

<canvas id="offset-x" width="200" height="200" style="border:1px solid #333;">
</canvas>

<script>
var c = document.getElementById("offset-x");
var ctx = c.getContext("2d");
ctx.shadowBlur = 15;
ctx.shadowOffsetX = 25;
ctx.shadowColor = "black";
ctx.fillStyle= "#2a9d8f";
ctx.fillRect(50, 50, 100, 100);
</script>

</body>
</html>

Output:


The HTML canvas shadowOffsetY property sets or returns the vertical distance of the shadow from the shape.

Example:

<!DOCTYPE html>
<html>
<body>

<canvas id="offset-y" width="200" height="200" style="border:1px solid #333;">
</canvas>

<script>
var c = document.getElementById("offset-y");
var ctx = c.getContext("2d");
ctx.shadowBlur = 15;
ctx.shadowOffsetY = 25;
ctx.shadowColor = "black";
ctx.fillStyle= "#2a9d8f";
ctx.fillRect(50, 50, 100, 100);
</script>

</body>
</html>

Output:


Enjoy coding!

Categories
Web development

HTML Canvas Gradients

The HTML canvas gradient can be used to fill shapes (like circles, squares, rectangles, lines, text, etc.).

HTML5 canvas gradients

You can create two different types of gradients:

createLinearGradient(x,y,x1,y1) – creates a linear gradient.

Syntax:

context.createLinearGradient(x0,y0,x1,y1);

Example:

<!DOCTYPE html>
<html>
<body>

<canvas id="square-3" width="200" height="200" style="border:1px solid #333;">
</canvas>

<script>
var c = document.getElementById("square-3");
var ctx = c.getContext("2d");
var createGradient = ctx.createLinearGradient(0, 0, 150, 0);
createGradient.addColorStop(0, "#e76f51");
createGradient.addColorStop(0.5, "#f4a261");
createGradient.addColorStop(1, "#e9c46a");
ctx.fillStyle = createGradient;
ctx.fillRect(50, 50, 100, 100);
</script>

</body>
</html>

Output:


Where:

x0 – the x-coordinate of the start point of the gradient.

y0 – the y-coordinate of the start point of the gradient.

x1 – the x-coordinate of the endpoint of the gradient.

y1 – the y-coordinate of the endpoint of the gradient.

createRadialGradient(x,y,r,x1,y1,r1) – creates a radial/circular gradient.

Syntax:

context.createRadialGradient(x0,y0,r0,x1,y1,r1);

Example:

<!DOCTYPE html>
<html>
<body>

<canvas id="radialGradient" width="200" height="200" style="border:1px solid #333;">
</canvas>

<script>
var c = document.getElementById("radialGradient");
var ctx = c.getContext("2d");
var grd = ctx.createRadialGradient(100,100,30, 100,100,70);
grd.addColorStop(0, "#e76f51");
grd.addColorStop(1, "#e9c46a");
ctx.fillStyle = grd;
ctx.fillRect(50, 50, 100, 100);
</script>

</body>
</html>

Output:


x0 – the x-coordinate of the starting circle of the gradient.

y0 – the y-coordinate of the starting circle of the gradient.

r0 – the radius of the starting circle.

x1 – the x-coordinate of the ending circle of the gradient.

y1 – the y-coordinate of the ending circle of the gradient.

r1 – the radius of the ending circle.

To define different colors add two or more color stops. To create the color stops use the addColorStop():

Syntax:

gradient.addColorStop(stop,color);

Example:

<!DOCTYPE html>
<html>
<body>

<canvas id="colorStops" width="200" height="200" style="border:1px solid #333;"></canvas>

<script>
var c = document.getElementById("colorStops");
var ctx = c.getContext("2d");
 
var grd = ctx.createLinearGradient(0, 0, 170, 0);
grd.addColorStop(0, "black");
grd.addColorStop("0.3", "magenta");
grd.addColorStop("0.5", "blue");
grd.addColorStop("0.6", "green");
grd.addColorStop("0.8", "yellow");
grd.addColorStop(1, "red");
 
ctx.fillStyle = grd;
ctx.fillRect(50, 50, 100, 100); 
</script>

</body>
</html>

Output:


Enjoy coding!