
It’s easy to learn how to make a video into a GIF with Adobe Premiere Pro however sometimes the quality of a GIF can be lower than you expect.
Adobe Premiere Pro is a video editor and is not the best tool for creating a small size GIF.
If you tried exporting GIF from Adobe Premiere Pro using the “animated GIF” option, but the image output was still poor no matter what settings you chose, you can try to fix this issue with help of Adobe Photoshop.

To export high-quality GIFs using Adobe Premiere Pro and Adobe Photoshop follow the steps below and watch the video tutorial:
Step1.
Adobe Premiere Pro
Open the Adobe Premiere Pro and create the new sequence (go to the File ->New->Sequence…)

In the new sequence window, go to the settings and change the frame size to your preferred one. Make sure that the square pixels(Pixels Aspect Ratio) option has been selected. Press Okay.

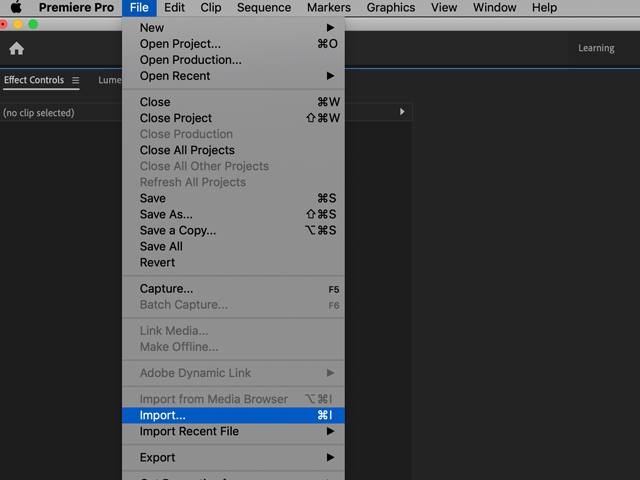
Go to File->Import, and select the video that you want to make into the GIF.
Drag your video to the sequence panel:

If your video is in a different size then your sequence will pop the information with Clip Mismatch Warning. Press Keep Existing Settings to do not change the sequence frame size.
After dragging a video to the sequence panel your video may not match with the sequence. To fix this click on your video in the sequence panel and go to Effect Controls.

In the Effect Controls panel go to the Scale. Use the horizontal slider to fit the size of your video to the sequence.
If you want to move a video horizontally, or vertically go to the Position option (in the Effect Controls panel).
The first value in the Position option defines the horizontal position, the second value defines the vertical position. Change the values to set the wanted position of your video.

Go to File->Export->Media..

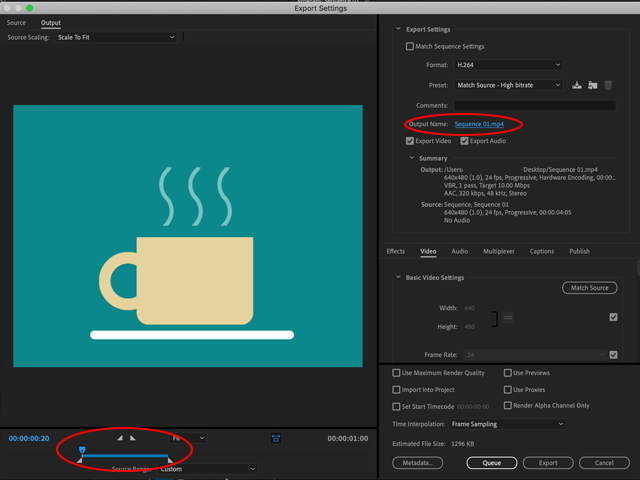
In the Export Settings, go to the format and select from the drop-down menu an option H.264 (to export a video in mp4 format).

At the bottom of the Export Settings, select the part of the movie that you want to export. On the right side of the Export Setting, you can change the name of your movie and the localization. Press Export.
Step2.
Adobe Photoshop
Open Photoshop and go to File->Import and select an option Video Frames to Layers…
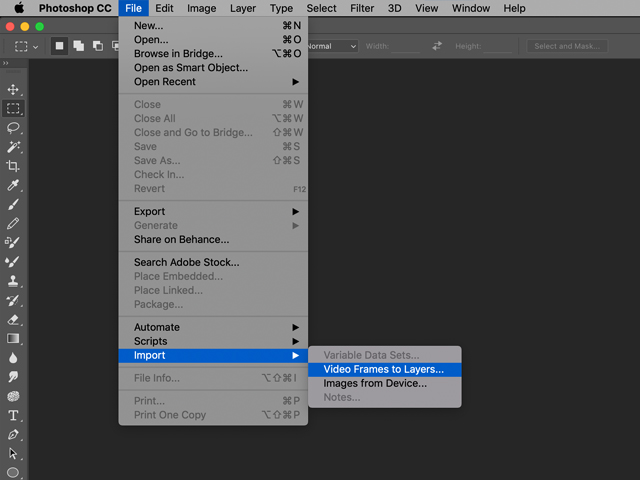
Choose a video exported from Adobe Premiere Pro, and make sure that the option – Make Frame Animation is ticked.

Go to Window->Timeline to see the timeline (all frames):


To export GIF in Photoshop go to File->Export->Save for Web(Legacy)…

Make sure that exported file will be in a GIF format. Change the Looping options to Forever. Press Save…

Your GIF is ready!
Watch also the video tutorial:
Hey, here’s something that might interest you:
How to create a GIF in Adobe Premiere Pro?