Categories
Web development

CSS Easter Animation


CSS Easter Animation

To learn how to create the CSS Easter Animation follow the steps below and watch the video tutorial.

Demo:

*to see the animation on the website click here.

Step1.

Add HTML

<div class="easter-animation">
  <div class="chick">
    <div class="beak"></div>
  </div>
  <div class="back-flower">
  <div class="daisy">
    <div class="flower"></div>
  </div>
  </div>
  <div class="egg">
    <div class="shell"></div>
  </div>
  <div class="egg-top">
    <div class="shell-top"></div>
  </div>
  <div class="daisy">
    <div class="flower"></div>
  </div>
  <div class="grass"></div>
  <p class="text">- hover over the egg -</p>
</div>

Step2.

Add CSS

Set the colour and the position of the background and elements:

body {
  display: flex;
  height: 100vh;
  overflow: hidden;
  align-items: center;
  justify-content: center;
  background-color: #94d2bd;
}

.easter-animation {
  position: relative;
  cursor: pointer;
}

Style the egg:

.egg {
   position: relative;
   width: 160px;
   height: 80px;
   background: linear-gradient(0deg, rgba(249,65,68,1) 30%, rgba(87,117,144,1) 30%, rgba(95,127,139,1) 60%, rgba(144,190,109,1) 60%, rgba(128,168,113,1) 95%, rgba(249,199,79,1) 95%);
   border-radius: 0% 100% 50% 50% / 0% 0% 100% 100%;
   top:90px;
}

.egg-top {
   position: absolute;
   width: 160px;
   height: 120px;
   background: linear-gradient(180deg, rgba(249,65,68,1) 40%, rgba(87,117,144,1) 40%, rgba(95,127,139,1) 70%, rgba(144,190,109,1) 70%, rgba(128,168,113,1) 95%, rgba(249,199,79,1) 95%);
   border-radius: 50% 50% 70% 30% / 100% 100% 0% 0%;
   top:-48px;
   left:0;
   transition: .2s;
}

.egg:before, .egg:after, .egg-top:before, .shell:before {
   content:"";
   position: absolute;
   border-style: solid;
}

.egg:before {
  border-color: transparent transparent #f9c74f transparent;
  border-width: 0 20px 20px 0;
  top: -19px;
}

.egg:after {
  border-color: transparent transparent #f9c74f transparent;
  border-width: 0 0 20px 20px;
  top: -19px;
  left: 140px;
}

.egg-top:before {
  border-color: #f9c74f transparent transparent transparent;
  border-width: 20px 20px 0 20px;
  top:120px;
}

.shell-top, .shell-top:before, .shell-top:after {
  position: absolute;
  border-style: solid;
  border-color: #f9c74f transparent transparent transparent;
  border-width: 20px 20px 0 20px;
}

.shell-top {
  left:40px;
  top:120px;
}

.shell-top:before, .shell-top:after {
  content:"";
  top:-20px;
}

.shell-top:before {
  left:20px;
}

.shell-top:after {
  left:60px;
}

.shell {
  position: absolute;
  z-index:-1;
}

.shell:before {
  border-color: transparent transparent #f9c74f transparent;
  border-width: 0 20px 20px 20px;
  top:-19px;
  left:20px;
  filter: drop-shadow(40px 0 #f9c74f) drop-shadow(40px 0 #f9c74f);
}

.shell:after {
  content:"";
  position: absolute;
  background-color: rgba(0,0,0,.1);
  width:160px;
  height: 40px;
  border-radius:50%;
  top:50px;
  left:0;
}

.egg-top:after {
  content:"";
  position: absolute;
  background-color: rgba(255,255,255,.2);
  width:25px;
  height:60px;
  border-radius:50%;
  transform: rotate(-27deg);
  top:20px;
  left:105px;
}

Add grass and flowers:

.grass {
  position: absolute;
}

.grass:before {
  content:"";
  position: absolute;
  border-left: 8px solid #90be6d;
  border-top: 1px solid #90be6d;
  border-top-left-radius: 100%;
  width: 40px;
  height: 60px;
  top:30px;
  left:130px;
  filter: drop-shadow(20px -5px #90be6d) drop-shadow(-120px -5px #90be6d);
}

.grass:after {
  content:"";
  position: absolute;
  border-right: 6px solid #90be6d;
  border-top: 1px solid #90be6d;
  border-top-right-radius: 100%;
  width: 30px;
  height: 50px;
  top:30px;
  left:90px;
  filter: drop-shadow(20px -5px #90be6d) drop-shadow(-120px -5px #90be6d);
}

.daisy {
  position: absolute;
  border-right: 7px solid #90be6d;
  border-top: 2px solid #90be6d;
  border-top-right-radius: 100%;
  width: 40px;
  height: 110px;
  top:50px;
  left:-15px;
}

.daisy:before, .daisy:after {
  content:"";
  position: absolute;
  background-color: white;
  border-radius:10px;
}

.daisy:before {
  width: 60px;
  height:10px;
  top:-10px;
  left:-25px;
}

.daisy:after {
  height:60px;
  width:10px;
  top:-35px;
}

.flower, .flower:before {
  position: absolute;
  background-color: white;
  border-radius:10px;
}

.flower {
  width:60px;
  height:10px;
  left:-25px;
  top:-10px;
  transform: rotate(45deg);
  z-index:2;
}

.flower:before {
  content:"";
  width:60px;
  height:10px;
  left:0;
  transform: rotate(90deg);
}

.flower:after {
  position: absolute;
  content:"";
  border-radius:50%;
  background-color: #f9c74f;
  width:10px;
  height:10px;
  top:0;
  left:25px;
}

.back-flower {
  position: absolute;
  transform: scaleX(-1) scale(.7);
  top:50px;
  left:160px;
}

Add transition on hover:

.easter-animation:hover .egg-top {
  transform: translateY(-55px);
}

Style and animate the chick:

.chick {
  position: absolute;
  background-color: #e9d8a6;
  border-radius: 50% 50% 50% 50% / 60% 60% 40% 40%;
  width:130px;
  height: 150px;
  left:15px;
  top:-10px;
  z-index:-3;
}

.chick:before {
  content:"";
  position: absolute;
  background-color: #333;
  width: 7px;
  height:10px;
  border-radius:50%;
  top:50px;
  left:50px;
  box-shadow: 25px 0 #333;
  transform-origin: 50%;
  animation: blink 2s infinite;
}
@keyframes blink {
    0%, 100% {transform: scale(1, .05);}
    5%, 95% {transform: scale(1, 1);}
}

.beak {
  position: absolute;
  border-color: transparent transparent #ee9b00 transparent;
  border-width: 0 25px 30px 25px;
  border-style: solid;
  left:40px;
  top:50px;
}

.beak:before {
  content:"";
  position: absolute;
  border-color: #d48a00 transparent transparent transparent;
  border-width: 20px 20px 0 20px;
  border-style: solid;
  top:29px;
  left:-19px;
}

Style the text:

.text {
  position: absolute;
  top:170px;
  width:100%;
  text-align: center;
  color: white;
  font-family: Brush Script MT;
  font-size:20px;
}

Watch also the video tutorial:

Enjoy coding!

Hey, here’s something that might interest you:

CSS Easter Eggs

CSS Easter Bunny/ Foldable Easter Card

CSS Christmas Tree Animation

Categories
Web development

CSS Easter Eggs


CSS Easter Eggs

To learn how to create the CSS Easter Eggs follow the steps below and watch the video tutorial.

Demo:

*to see the CSS Easter Eggs on the website click here.

Step1.

Add HTML

<div class="easter-eggs">
  <div class="egg-one">
    <div class="decoration"></div>
    <div class="dots"></div>
  </div>
  <div class="egg-two">
    <div class="shine"></div>
  </div>
  <div class="grass"></div>
</div>

Step2.

Add CSS

Set the colour and the position of the background and elements:

body {
  display: flex;
  align-items: center;
  justify-content: center;
  height: 100vh;
  background-color: #f1dca7;
  overflow: hidden;
}

.easter-eggs {
  position: relative;
  top:0;
  left:0;
}

Style the first egg:

.egg-one {
  position: relative;
  width: 170px;
  height: 220px;
  border-radius: 50% 50% 50% 50% / 60% 60% 40% 40%;
  background: radial-gradient( circle at 50% -10%, rgba(195,144,195,1) 20%, rgba(195,144,195,1) 20%, rgba(243,216,109,1) 20%, rgba(243,216,109,1) 40%, rgba(140,197,87,1) 40%, rgba(140,197,87,1) 60%, rgba(74,166,156,1) 60%, rgba(74,166,156,1) 80%, rgba(239,137,160,1) 80%, rgba(239,137,160,1) 100%);
  overflow: hidden;
  transform: rotate(20deg);
  filter: drop-shadow(0 0 15px rgba(0,0,0,.2));
}

.egg-one:before, .egg-one:after, .decoration:before, .decoration:after, .dots {
  content:"";
  position: absolute;
  width: 20px;
  height: 35px;
  border-radius:50%;
}

.egg-one:before {
  background-color: #ed87a4;
  top:37px;
  left:75px;
  box-shadow: 0 105px #f3d86d;
}

.egg-one:after {
  background-color: #ed87a4;
  transform: rotate(30deg);
  top:25px;
  left:35px;
}

.decoration {
  position: absolute;
}

.decoration:before {
  background-color: #ed87a4;
  transform: rotate(-30deg);
  top:25px;
  left:115px;
}

.decoration:after {
  background-color: #f3d86d;
  top:135px;
  left:30px;
  transform: rotate(-10deg);
  box-shadow: -35px -20px #f3d86d;
}

.dots {
  background-color: #f3d86d;
  top: 120px;
  left:155px;
  transform: rotate(10deg);
  box-shadow: -35px 20px #f3d86d;
  z-index:2;
}

.dots:before, .dots:after {
  content:"";
  position: absolute;
  background-color: rgba(255,255,255,.3);
  border-radius:50%;
}

.dots:before {
  width:40px;
  height:70px;
  left:-150px;
  top:-40px;
}

Style the second egg:

.egg-two {
  position: absolute;
  width: 170px;
  height: 220px;
  border-radius: 50% 50% 50% 50% / 60% 60% 40% 40%;
  background: radial-gradient(circle at 50% -10%, rgba(247,225,124,1) 20%, rgba(247,225,124,1) 20%, rgba(160,198,88,1) 20%, rgba(185,206,98,1) 27%, rgba(247,225,124,1) 27%, rgba(247,225,124,1) 32%, rgba(171,201,93,1) 32%, rgba(160,198,88,1) 40%, rgba(237,142,180,1) 40%, rgba(237,142,180,1) 60%, rgba(85,191,215,1) 60%, rgba(247,225,124,1) 60%, rgba(247,225,124,1) 64%, rgba(89,188,214,1) 64%, rgba(85,191,215,1) 80%, rgba(158,121,185,1) 80%, rgba(158,121,185,1) 100%);
  overflow: hidden;
  top:30px;
  left:140px;
  transform: rotate(-110deg);
  filter: drop-shadow(0 0 15px rgba(0,0,0,.2));
}

.egg-two:before, .egg-two:after {
  content:"";
  position: absolute;
  border-radius: 50%;
  width:30px;
  height: 30px;
}

.egg-two:before {
  background-color: #56c1d3;
  top:70px;
  box-shadow: 40px 20px #56c1d3, 90px 20px #56c1d3, 140px 0 #56c1d3;
}

.egg-two:after {
  background-color: #f08cb6;
  top:125px;
  left:-20px;
  box-shadow: 40px 15px #f08cb6, 90px 22px #f08cb6, 140px 15px #f08cb6, 185px 0 #f08cb6;
}

.shine {
  position: absolute;
  background-color: rgba(255,255,255,.3);
  border-radius:50%;
  width:40px;
  height:70px;
  top:90px;
  left:120px;
  z-index:2;
}

Add some grass:

.grass {
  position: absolute;
  border-top: 1px solid #90be6d;
  border-left: 6px solid #90be6d;
  width: 35px;
  height: 50px;
  border-top-left-radius: 100%;
  top:170px;
  filter: drop-shadow(30px 0 #90be6d) drop-shadow(160px 0 #90be6d) drop-shadow(120px 0 #90be6d);
}

.grass:before {
  content:"";
  position: absolute;
  border-top: 1px solid #90be6d;
  border-right: 6px solid #90be6d;
  width: 35px;
  height: 50px;
  border-top-right-radius: 100%;
  top:0;
  filter: drop-shadow(30px 0 #90be6d) drop-shadow(30px 0 #90be6d);
  left:-60px;
}

.grass:after {
  content:"";
  position: absolute;
  border-top: 1px solid #90be6d;
  border-right: 6px solid #90be6d;
  width: 20px;
  height: 35px;
  border-top-right-radius: 100%;
  top:20px;
  filter: drop-shadow(30px 0 #90be6d) drop-shadow(30px 0 #90be6d);
  left:-60px;
}

Watch also the video tutorial:

Enjoy coding!

Hey, here’s something that might interest you:

CSS Easter Bunny/ Foldable Easter Card

CSS Egg Shape and CSS Easter eggs

CSS Background Stripes

Categories
Web development

HTML hidden Attribute


HTML hidden Attribute

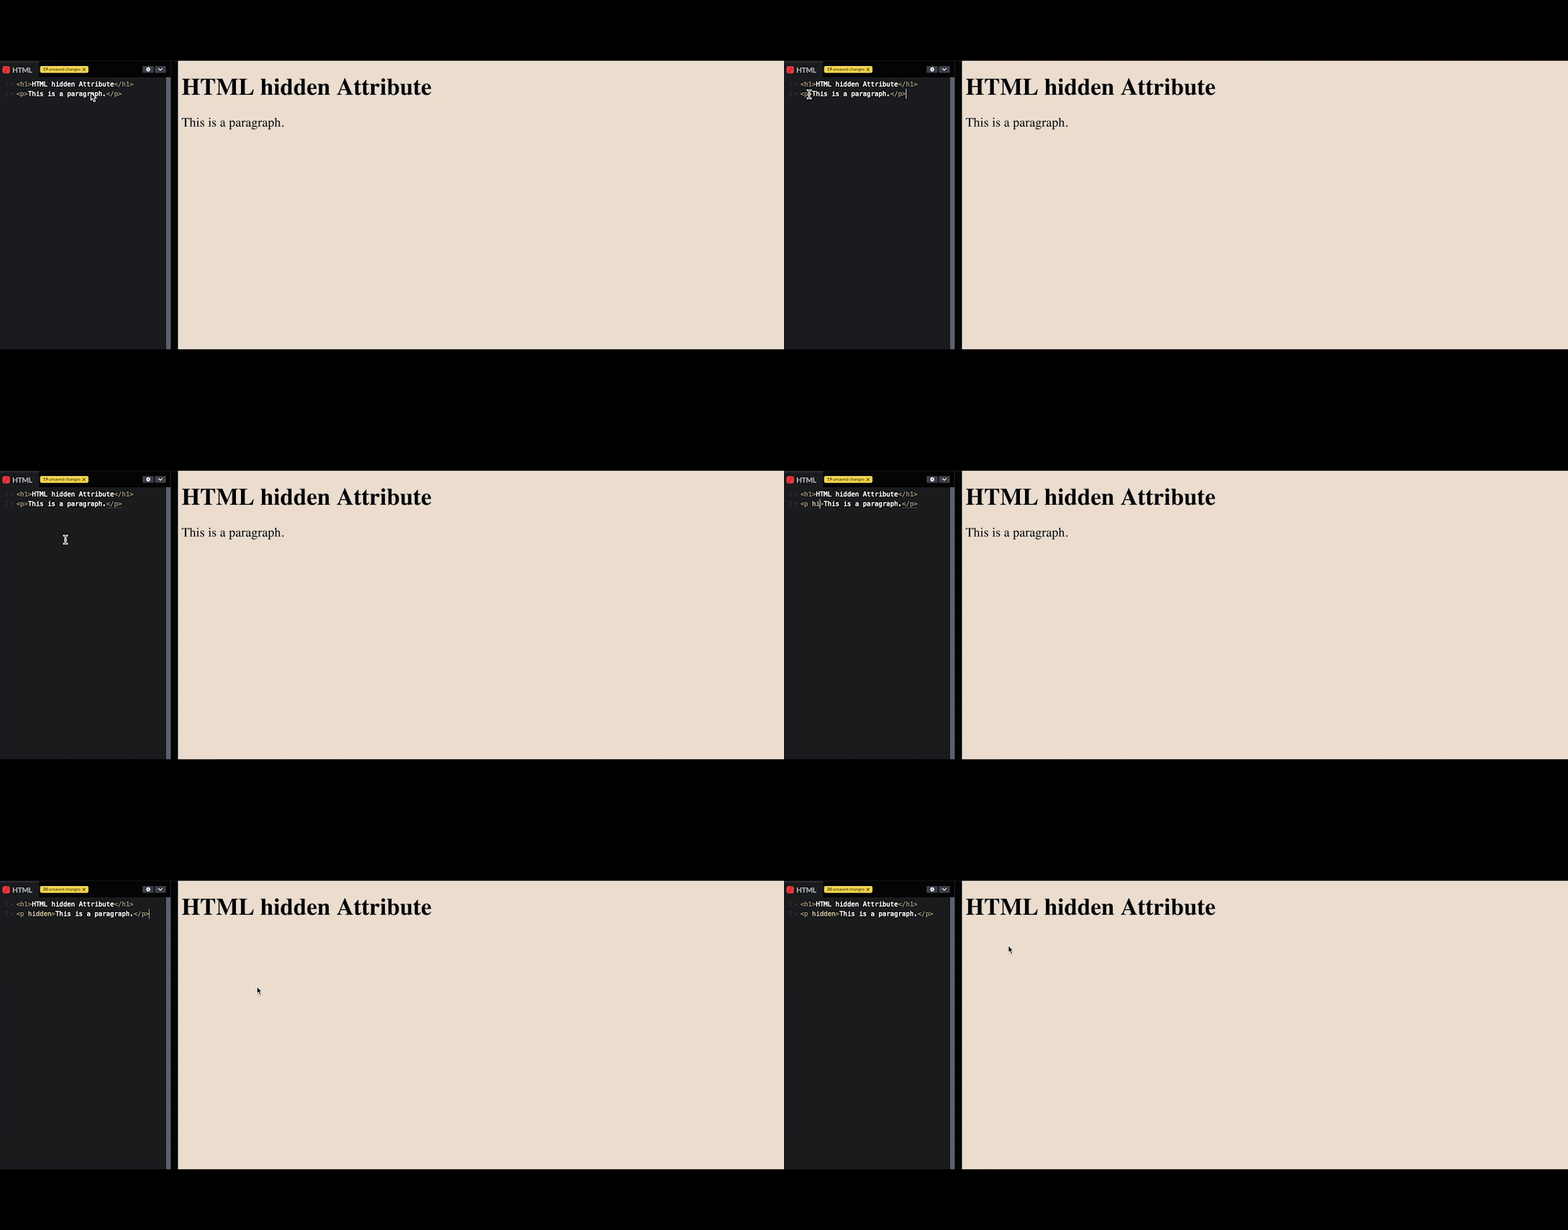
The HTML hidden attribute is a boolean attribute. When applied, it defines that an element is not yet, or is no longer, relevant.

The HTML hidden attribute can be used on all HTML elements.

Example:

<!DOCTYPE html>
<html>
<body>

<p hidden>This is a paragraph.</p>
<p>This is a paragraph.</p>

</body>
</html>

Output:

A hidden paragraph:

This is a paragraph.


Enjoy coding!

Read also:

HTML input accept Attribute

HTML alt Attribute

HTML class Attribute

Categories
Web development

HTML href Attribute

HTML href Attribute

The HMTL href attribute defines the URL of the page the link goes to.

The HTML href attribute belongs to the following tags:

HTML <a> href Attribute

Syntax:

<a href="URL">

URL – the URL of the link.

Example:

<!DOCTYPE html>
<html>
<body>

<p>Click on the link: <a href="https://www.lenastanley.com/">CodeLife: Animations</a></p>

</body>
</html>

Output:

Click on the link: CodeLife: Animations

HTML <area> href Attribute

Syntax:

<area href="URL"> 

URL – defines the hyperlink target for the area.

Example:

<!DOCTYPE html>
<html>
<body>

<p>Click on the laptop, or the cup of coffee:</p>

<img src="https://lenadesign.org/wp-content/uploads/2021/06/homeOffice.jpg" alt="homeOffice" usemap="#workmap" width="640" height="480">

<map name="workmap">
  <area shape="rect" coords="34,44,270,350" alt="laptop" href="https://lenadesign.org/wp-content/uploads/2021/06/laptop.jpg">
  <area shape="circle" coords="337,300,44" alt="coffee" href="https://lenadesign.org/wp-content/uploads/2021/06/photoshop-gif.gif">
</map>

</body>
</html>

Output:

Click on the laptop or the cup of coffee:

<div class="ar">
<img src="https://lenadesign.org/wp-content/uploads/2021/06/homeOffice.jpg" alt="homeOffice" usemap="#workmap" width="640" height="480">

<map name="workmap">
  <area shape="circle" coords="280,210,45" alt="laptop" href="https://lenadesign.org/wp-content/uploads/2021/06/laptop.jpg">
  <area shape="circle" coords="160,210,45" alt="coffee" href="https://lenadesign.org/wp-content/uploads/2021/06/photoshop-gif.gif">
</map>
</div>

HTML <link> href Attribute

Syntax:

<link href="URL"> 

URL – the URL of the linked resource/document.

Example:

<!DOCTYPE html>
<html>
<head>
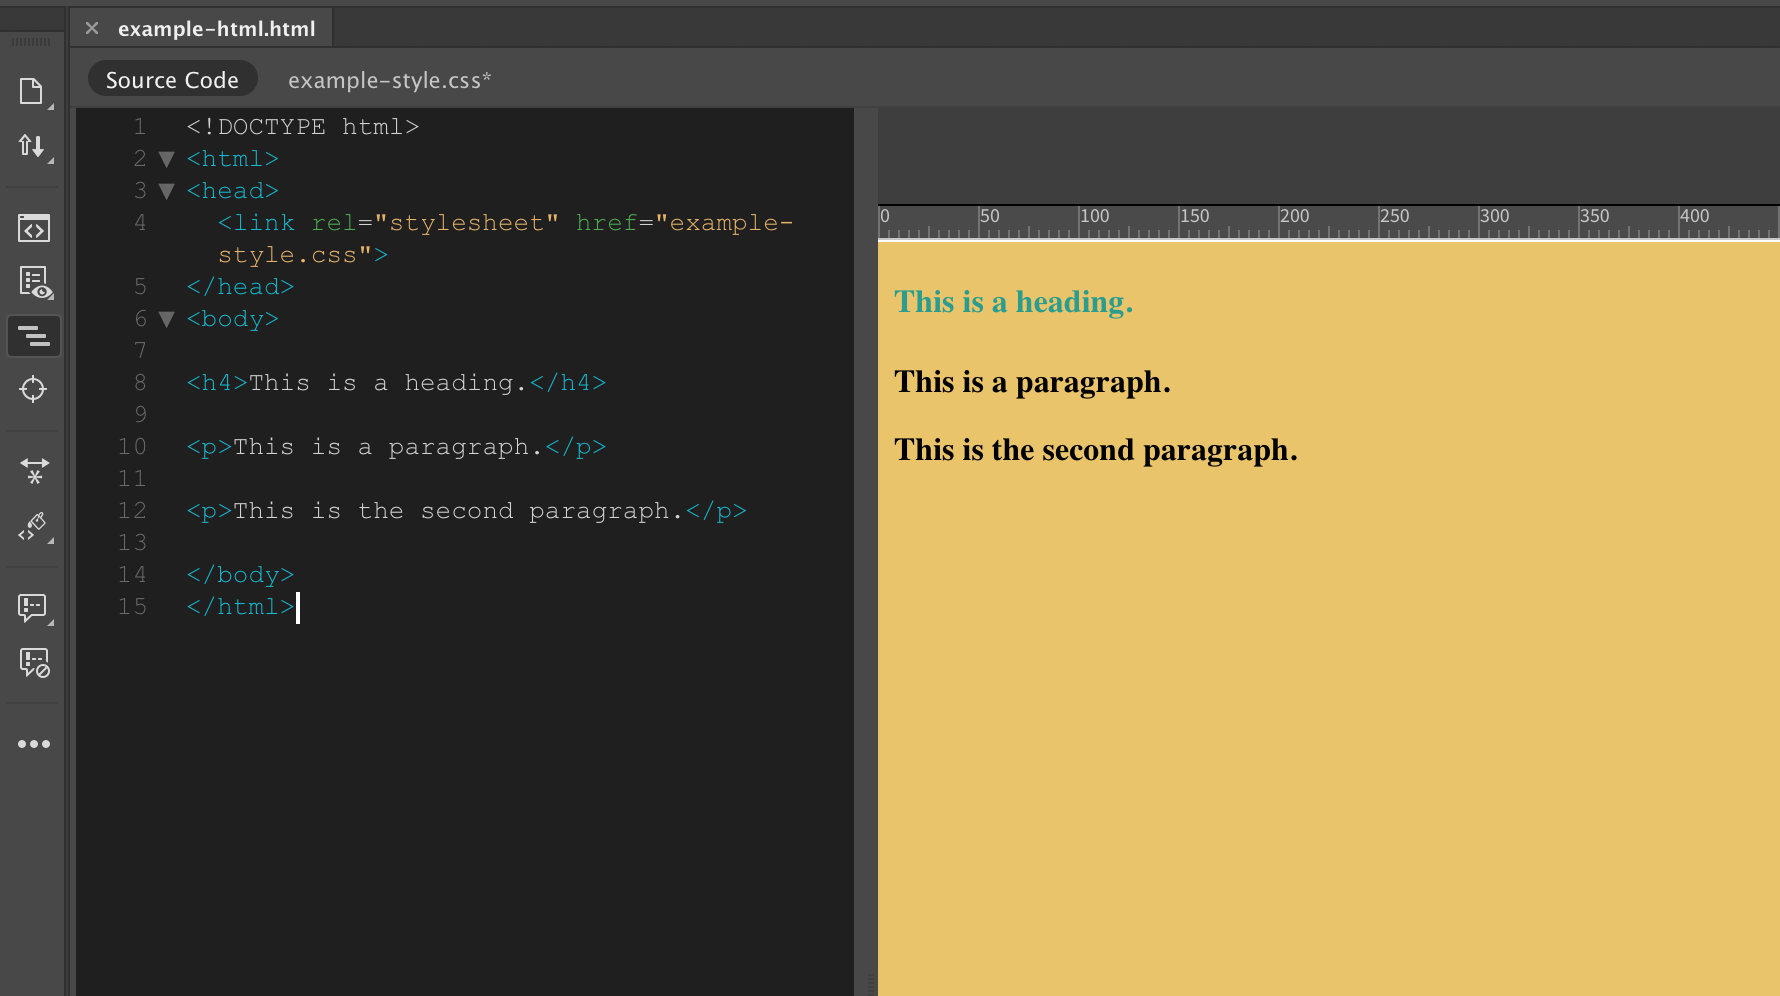
  <link rel="stylesheet" href="example-style.css">
</head>
<body>

<h4>This is a heading.</h4>

<p>This is a paragraph.</p>

<p>This is the second paragraph.</p>

</body>
</html>

Output:

Example CSS stylesheet

Read also:

HTML accesskey Attribute

HTML draggable Attribute

HTML style Attribute

Categories
Web development

How do you add a link to a whole div?

How to make a whole div clickable?

To make the entire div clickable follow the steps below and watch the video tutorial.

Demo:

Step1.

Add HTML

Create the div element:

<!DOCTYPE html>
<html>
<head>
</head>
<body>

<div class="example">
  <h3>What is a Web Developer?</h3>
  <p>A Web Developer is a kind of programmer who takes a web design, which has been created by a client or design team and turns it into a website or distributed network applications...</p>
  </div>

</body>
</html>

Step2.

Add CSS

Style the div element:

<!DOCTYPE html>
<html>
<head>

<style>
.example {
  padding:20px;
  width:200px;
  background-color: lightblue;
}
</style>

</head>
<body>

<div class="example">
  <h3>What is a Web Developer?</h3>
  <p>A Web Developer is a kind of programmer who takes a web design, which has been created by a client or design team and turns it into a website or distributed network applications...</p>
  </div>

</body>
</html>

Output:

What is a Web Developer?

A Web Developer is a kind of programmer who takes a web design, which has been created by a client or design team and turns it into a website or distributed network applications…

Step3.

Add a link

Open an <a> element at the beginning of the div and close at the end. Add the href attribute with the link.

Optional: Add the target attribute to open the link in a new tab.

<!DOCTYPE html>
<html>
<head>

<style>
.example {
  padding:20px;
  width:200px;
  background-color: lightblue;
}
</style>

</head>
<body>
<a href="https://lenadesign.org/2019/12/22/what-is-a-web-developer/" target="_blank">
<div class="example">
  <h3>What is a Web Developer?</h3>
  <p>A Web Developer is a kind of programmer who takes a web design, which has been created by a client or design team and turns it into a website or distributed network applications...</p>
  </div>
     </a>
</body>
</html>

Output:

Step4.

To remove the line under the link use the CSS text-decoration Property:

<!DOCTYPE html>
<html>
<head>

<style>
.example {
  padding:20px;
  width:200px;
  background-color: lightblue;
}

a {
  text-decoration: none;
}
</style>

</head>
<body>
<a href="https://lenadesign.org/2019/12/22/what-is-a-web-developer/" target="_blank">
<div class="example">
  <h3>What is a Web Developer?</h3>
  <p>A Web Developer is a kind of programmer who takes a web design, which has been created by a client or design team and turns it into a website or distributed network applications...</p>
  </div>
     </a>
</body>
</html>

Output:

Enjoy coding!

Watch also the video tutorial:

Read also:

CSS Styling Links

How to put an image into HTML code?

How to change the text on Hover?

Categories
Web development

HTML target Attribute

HTML target Attribute

The HTML target attribute defines the target for where to open the linked document or where to submit the form.

The HTML target attribute belongs to the following tags:

HTML <a> target Attribute

Syntax:

<a target="_blank|framename|_parent|_self|_top"> 

_blank – opens the linked document in a new window or tab.

framename – opens the linked document in the named iframe.

_parent – opens the linked document in the parent frame.

_self (default) – opens the linked document in the same frame as it was clicked.

_top – opens the linked document in the full body of the window.

Example:

<!DOCTYPE html>
<html>
<body>

<p>Open link in a new tab: <a href="https://www.lenastanley.com/" target="_blank">CodeLife:Animations</a></p>

</body>
</html>

Output:

Open link in a new tab: CodeLife:Animations

HTML <area> target Attribute

Syntax:

<area target="_blank|framename|_parent|_self|_top"> 

_blank – opens the linked document in a new window or tab.

framename – opens the linked document in the named iframe.

_parent – opens the linked document in the parent frame.

_self (default) – opens the linked document in the same frame as it was clicked.

_top – opens the linked document in the full body of the window.

Example:

<!DOCTYPE html>
<html>
<body>

<img src="https://lenadesign.org/wp-content/uploads/2021/06/homeOffice.jpg" alt="homeOffice" usemap="#workmap" width="640" height="480">

<map name="workmap">
  <area shape="rect" coords="34,44,270,350" alt="laptop" href="https://lenadesign.org/wp-content/uploads/2021/06/laptop.jpg" target="_blank">
  <area shape="circle" coords="337,300,44" alt="coffee" href="https://lenadesign.org/wp-content/uploads/2021/06/photoshop-gif.gif" target="_blank">
</map>

</body>
</html>

Output:

Click on the laptop or the cup of coffee to open an image in a new tab:

homeOffice laptop coffee

HTML <form> target Attribute

Syntax:

<form target="_blank|framename|_parent|_self|_top"> 

_blank – opens the linked document in a new window or tab.

framename – opens the linked document in the named iframe.

_parent – opens the linked document in the parent frame.

_self (default) – opens the linked document in the same frame as it was clicked.

_top – opens the linked document in the full body of the window.

Example:

<!DOCTYPE html>
<html>
<body>

<form action="" method="get" target="_blank">
  <label for="fname">First name:</label>
  <input type="text" id="first-name" name="firstname"><br><br>
  <label for="lname">Surname:</label>
  <input type="text" id="surname" name="surname"><br><br>
  <input type="submit" value="Submit">
</form>

</body>
</html>

Output:


Enjoy coding!

Read also:

HTML action Attribute

HTML data-* Attribute

Categories
Web development

HTML style Attribute

HTML style Attribute

The HTML style attribute defines a style for an element (can be used on all HTML elements).

The HTML style attribute overrides any style set globally (for example styles defined in the <style> tag).

Example:

<!DOCTYPE html>
<html>
<body>

<p style="color:#e76f51; text-decoration: underline;">This is a paragraph.</p>
<h4 style="color:#264653; background-color: #e9c46a;">This is a header.</h4>

</body>
</html>

Output:

This is a paragraph.

This is a header.


Read also:

HTML Attributes

HTML List Tags

HTML Media

Categories
Web development

HTML src Attribute

HTML src Attribute

The HTML src attribute defines the location (URL) of the external resource.

The HTML src attribute applies to the following elements:

Examples:

An audio player with the source file:

<!DOCTYPE html>
<html>
<body>

<audio controls>
  <source src="https://lenadesign.org/wp-content/uploads/2021/07/Wooden-Train-Whistle.mp3" type="audio/mpeg">
</audio>

</body>
</html>

Output:


An iframe element embedding another document within the current HTML document:

<!DOCTYPE html>
<html>
<body>

<iframe src="https://www.lenastanley.com/" title="lena design">
</iframe>

</body>
</html>

Output:


An image element:

<!DOCTYPE html>
<html>
<body>

<img src="https://lenadesign.org/wp-content/uploads/2019/12/avatar.jpg" alt="avatar" width="640" height="480">

</body>
</html>

Output:

avatar

The HTML <input type=”image”> defines an image as a submit button:

<!DOCTYPE html>
<html>
<body>

<form action="">
  <label for="fname">First name: </label>
  <input type="text" id="fname" name="fname"><br><br>
  <label for="lname">Last name: </label>
  <input type="text" id="lname" name="lname"><br>
  <input type="image" src="https://lenadesign.org/wp-content/uploads/2021/06/submit-button.png" alt="Submit" width="100" height="100">
</form>

</body>
</html>

Output:


Play a video:

<!DOCTYPE html> 
<html> 
<body> 

<video width="640" controls src="https://videos.files.wordpress.com/lFj3lsG4/valentines-day-movie_dvd.mp4" type="video/mp4">
</video>

</body> 
</html>

Output:

Read also:

HTML Attributes

HTML Media

HTML Form Elements

Categories
Web development

HTML caption tag

HTML caption tag

The HTML caption element specifies a table caption.

The HTML <caption> tag has to be inserted immediately after the <table> tag.

To align and place caption you can use CSS caption-side property or CSS text-align property.

Example:

<!DOCTYPE html>
<html>
<head>
<style>   
table, th, td {
        border-collapse: collapse;
        border: 1px solid black;
    }

</style>
</head>
<body>
<table>
<caption>List of employees:</caption>
  <tr>
    <th>Name</th>
    <th>Job Title</th>
    <th>e-mail</th>
  </tr>
  <tr>
    <td>Adam White</td>
    <td>IT Coordinator</td>
    <td>white@example.com</td>
  </tr>
  <tr>
    <td>Tom Brown</td>
    <td>Web Developer</td>
    <td>brown@example.com</td>
  </tr>
  <tr>
    <td>Matt Smith</td>
    <td>Network Administrator</td>
    <td>matt@example.com</td>
  </tr>
</table>
</body>
</html>

Output:

List of employees:
Name Job Title e-mail
Adam White IT Coordinator white@example.com
Tom Brown Web Developer brown@example.com
Matt Smith Network Administrator matt@example.com

Enjoy coding!

Read also:

HTML Table

HTML Table Headers

CSS border-collapse Property

Categories
Web development

HTML Table Headers

HTML Table Headers

Table headers are specified with <th> tag (each th element represents a table cell).

Demo:

Name Surname Occupation
John Doe Web Developer
Martha Brown Teacher
Matt Smith Plumber
Name Occupation
John Doe Web Developer
Martha Brown Teacher
Matt Smith Plumber
Customer details
Name Surname e-mail
Joe Doe joedoe@example.com
Martha Brown brown221@example.com

The HTML table can have headers for each column/row.

Example:

<!DOCTYPE html>
<html>
<head>
<style>
table, th, td {
  border: 1px solid black;
  border-collapse: collapse;
}
</style>
</head>
<body>

<table style="width:100%">
  <tr>
    <th>Name</th>
    <th>Surname</th>
    <th>Occupation</th>
  </tr>
  <tr>
    <td>John</td>
    <td>Doe</td>
    <td>Web Developer</td>
  </tr>
  <tr>
    <td>Matt</td>
    <td>Smith</td>
    <td>Plumber</td>
  </tr>
 <tr>
    <td>Martha</td>
    <td>Brown</td>
    <td>Teacher</td>
  </tr>
</table>

</body>
</html>

Output:

Name Surname Occupation
John Doe Web Developer
Martha Brown Teacher
Matt Smith Plumber

You can create a header that spans over two columns (or more).

Example1:

<!DOCTYPE html>
<html>
<head>
<style>
table, th, td {
  border: 1px solid black;
  border-collapse: collapse;
}
</style>
</head>
<body>

<table style="width:100%">
  <tr>
    <th colspan="2">Name</th>
    <th>Occupation</th>
  </tr>
  <tr>
    <td>John</td>
    <td>Doe</td>
    <td>Web Developer</td>
  </tr>
  <tr>
    <td>Martha</td>
    <td>Brown</td>
    <td>Teacher</td>
  </tr>
   <tr>
    <td>Matt</td>
    <td>Smith</td>
    <td>Plumber</td>
  </tr>
</table>
</body>
</html>

Output:

Name Occupation
John Doe Web Developer
Martha Brown Teacher
Matt Smith Plumber

Example2:

<!DOCTYPE html>
<html>
<head>
<style>
table, th, td {
  border: 1px solid black;
  border-collapse: collapse;
}

th {
text-align: center;}

</style>
</head>
<body>

<table style="width:100%">
  <tr>
    <th colspan="3">Customer details</th>
  </tr>
   <tr>
    <th>Name</th>
    <th>Surname</th>
    <th>e-mail</th>
  </tr>
  <tr>
    <td>Joe</td>
    <td>Doe</td>
    <td>joedoe@example.com</td>
  </tr>
  <tr>
    <td>Martha</td>
    <td>Brown</td>
    <td>brown221@example.com</td>
  </tr>
</table>
</body>
</html>

Output:

Customer details
Name Surname e-mail
Joe Doe joedoe@example.com
Martha Brown brown221@example.com

Enjoy coding!

Read also:

HTML Table

CSS border-collapse Property

CSS border-spacing Property